
That’s right, as promised, I’m going to torture myself with Jenkins some more, this time with multi-branch pipelines!
If you missed it, I recently wrote a blog post in which I explained how to integrate Jenkins and Github with freestyle jobs. In that post, I stipulated that were I able to use Multi-Branch pipelines, my life would have been much easier. Well, it’s true. Sort of. Multi-branch pipelines, once you get them working are much, much better than freestyle jobs. As you may have guessed, the problem is the initial setup, because Jenkins has incredibly cryptic error messages. Thanks pals.
Anyway, I’ve figured it out so you don’t have to, so let’s get started!
The first thing you want to do is set up your github user account and repository, before you even touch Jenkins. Unlike last time, where the order of things didn’t matter , this time it’s extremely important if you want everything to go smoothly.
Navigate to your personal access tokens settings on Github. You want to create a token with the following permissions:admin:org_hook, admin:repo_hook, repo, user:email
They’re a bit more powerful than last time, but that does mean that Jenkins can set up the repo hooks for you so you don’t have to.
Now go to your repository and create a Jenkinsfile. That’s right, we’re creating the CI/CD pipeline before we’ve even touched Jenkins at all. This is because if Jenkins doesn’t find a Jenkinsfile, it pretends that your credentials are wrong and sends you on a wild goose chase, even if they’re absolutely fine. So just pick one of the hello world examples – it really doesn’t matter what, and all they do is display a version string, but you really want a valid Jenkinsfile.
Now go to Jenkins and click create new job or new item, and select multi-branch pipeline. Coincidentally, if this is the first time you’ve ran Jenkins, you might get an infinite loading screen. If that happens, just turn it off and back on again.

- Click the “add source” dropdown and select Github.
- Within credentials, click ‘add’ and select ‘Jenkins’.
- Keep Kind as ‘username with password.
- As username, enter your github username
- As password, enter the access token from earlier. If you’ve lost it, like I have, you can just regenerate it provided it’s not being used anywhere else.
- Under repository https url enter the url of your repository, which can be a private repo.
Now if you click apply and save, your github repo should have a new webhook!
Edit: If it’s not been added automatically, go to Jenkins config -> global config -> github, and see the “by default” section, which will give you the URL, which you can manually create a webhook for on Github. It needs the “pull request” and “push” hooks.
If it’s worked so far, you may be tempted to click on “Scan repository now”. Bad idea. It won’t work, and it will confuse you.
What you ACTUALLY have to do, is commit a change to master (or whatever branch has the Jenkinsfile). If you do that, and wait a minute, it should automatically build!
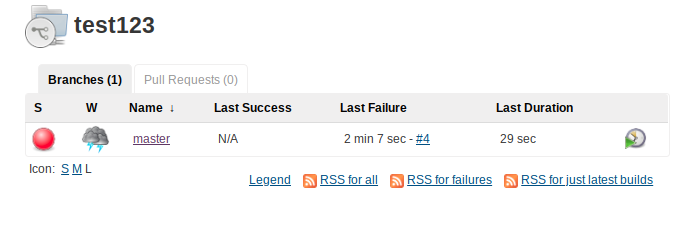
The commit on Github will also be updated to show success or failure.

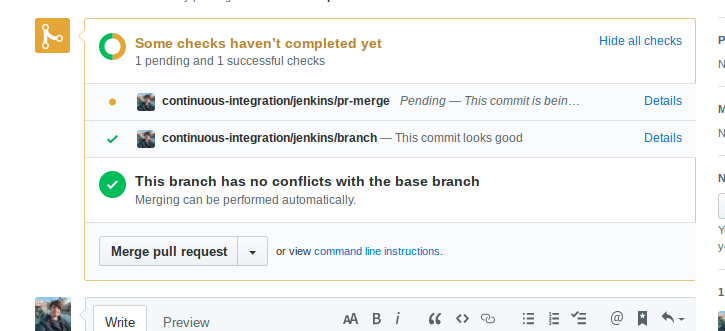
You’ll also see PR status!
As you can see, Multi-branch pipelines are already much easier to work with! I just wish Jenkins weren’t so cryptic – I wasted way too much time thinking it wasn’t working because I either hadn’t given it enough permissions, or I thought scanning was supposed to work.
Hope you have found this informative! Maybe next time I’ll dive deeper into multi-branch pipelines and build something cool!