My personal website is one of the places where I can easily experiment, and it has been written and rewritten a few times. Having said that, laziness meant that it was stuck on its previous PHP-laravel implementation for a while.
PHP was one of the first things I learned as a developer, and at the time I was learning some frameworks at University and thought Laravel was a decent way of organising my code.
In the recent years I’ve been experimenting with newer technologies like node.js, and I believe server-side rendering of Single Page Apps gives you the best of both worlds in a way: the advantages in development speed, service workers, and frameworks for organising frontend code of SPAs and the SEO advantages of a server-rendered app.
In this case, I chose vue.js as it’s a lightweight and simple to use framework, and in particular nuxt.js which allows you to do Server-side rendering (SSR) with Vue.js and a server framework of choice such as express.
Essentially, nuxt (vue SSR) is good old vue.js with the first page load being rendered on the server, so that search engines can still parse the content. Additionally, it’s easy to implement API routes to execute server-side code with node.js. In this article, I’ll explain how I achieved this for this website.
Note that I do recommend looking into the basics of vue.js and node.js before reading this guide, as I will assume knowledge on them.
Creating the app
The first thing to do is to install create-nuxt-app (npm install -g create-nuxt-app). Then, we can use this to get the boilerplate for our app:
npx create-nuxt-app errietta.me-nuxt
If you observe the created directory, you’ll see… A lot of boilerplate!
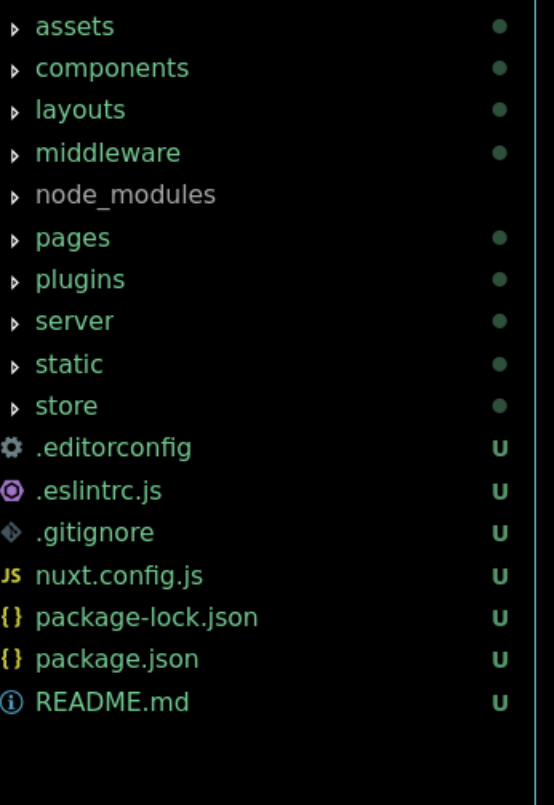
Not all of those directories are needed, but it’s worth keeping them around until you know what you’ll need for your project.
The nuxt.js directories
This is a quick introduction to the directories created by nuxt.js; feel free to skip this section if it’s not interesting to you.
assetscontains files such as svgs and images that are loaded by webpack’sfile-loader. This means you canrequirethem within your javascript code.- This is in contrast to the
staticdirectory, from which files will just be served by express as static files.
- This is in contrast to the
componentscontains all the parts that make up a page, such as aLogocomponent, or aParagraphcomponent, or aBlogPostcomponent. These are like the building blocks for your pages.layoutsThis is a way to create a wrapper or multiple wrappers around your page content, so that you can have common content around your page such as headers, footers, navbars, and so on.middlewareis a way to run code before your pages are rendered. You may want to check if a user is authenticated, for example.pagesis where the main code of your pages go.pagescan fetch data via AJAX and loadcomponents. This is code that will be executed by both the client and server, so if you have code you only want to execute on the server, you want it accessible by an HTTP api that your pages code can use.pluginsis a directory to include third party plugins.serveris your express (or other framework) server code. You can just use the framework as normal, provided you keep the code thatnuxt.jsauto-injects, which takes care of the SSR for you. This is where you can create your APIs that will be accessed by either the server on page load or through AJAX by your SPA.storecontains code for your VUEX store.
Developing the application
Now that we know what the directories are about, it’s finally time to get our hands dirty. In the metaphorical sense, of course. Please don’t type with dirty hands…
For my pages, it was mostly static content, so it was easy going. For example, index.vue is the default home page, and I started by standard vue.js code:
<template>
  <div>
    <h1>Hello world!</h1>
     Welcome to my website.
  </div>
</template>

<script>
export default {
  name: 'Index',
  components: { },
  props: { },
  asyncData( { } ) { }
  computed: { }
}
</script>

<style scoped>
h1 {
  font-size: 200%;
}
</style>
Nothing out of the ordinary so far. However, my website’s homepage continues the excerpts of my latest blog posts, and in order to retrieve that I want to parse my blog’s RSS. I wanted to do the actual work on the node.js server side, so that I can replace it by a proper API call later on if I wish. In this case, I could call this code from both client and server side, but there are cases that you want server side only code such as database connections, so this is a good example of it.
What I mean by that is that the code to actually fetch the blog posts will always be executed by the node server. The SPA will simply load data from that server, either on load when it’s rendered, or by an HTTP request as explained earlier. Hopefully the below diagram explains what happens:
# Case 1: initial page load

VUE SSR (node) --HTTP--> express api (node) --> blog RSS

# Case 2: content loaded by HTTP on SPA

VUE (browser)  --HTTP--> express api (node) --> blog RSS
You can therefore see that no matter the entry to the app, the business logic only exists and is executed on the node layer.
My next step here was to create server/api/posts.js to create said business logic:
const Parser = require('rss-parser')

const postsApi = async (req, res) => {
  const posts =  await parser.parseURL('https://www.errietta.me/blog/feed')
  // transform data to a uniform format for my api
  return res.json(posts)
}

module.exports = postsApi
This is a simplified version, I have some more logic here if you’re curious: https://github.com/errietta/errietta.me-nuxt/blob/master/server/api/posts.js but it doesn’t matter; the main point is that the retrieval of the data is done on nodejs.
Now, we can add this route to server/index.js before the app.use(nuxt.render) line. This is because the nuxt middleware will handle all routes that are not handled by other middleware.
  app.use('/api/posts', require('./api/posts'))
  app.use(nuxt.render)
Now we simply need to call this API in the asyncData section of our page. asyncData is a nuxt function that is executed both on rendering the content on the server side and client side. We already have asyncData in index.vue so we can modify it.
  asyncData({ $axios }) {
    return $axios.get('api/posts').then(res => ({ posts: res.data })).catch((e) => {
      // eslint-disable-next-line
      console.log(e)
      return { posts: [] }
    })
  },
Note that we are getting $axios from the object passed to the function. This is the nuxt.js axios plugin, which has special configuration to work with vue. It works the same way as a regular axios instance, so as you can see we are performing an HTTP request to our API. Note that this will perform an HTTP request no matter if it’s done through the server or client, but because the server-side request is done locally it should not impact performance.
So far, the posts are not used anywhere. Let’s make a posts component in components/Posts.vue
<template>
  <div>
    <div v-for="item in posts" :key="item.id">
      <h4>
        <a :href="item.link">
          {{ item.title }}
        </a>
      </h4>
      <p v-html="item.content" />
    </div>
  </div>
</template>

<script>
export default {
  name: 'Posts',
  props: {
    posts: {
      type: Array,
      default: () => []
    }
  }
}
</script>
Note: be careful with v-html. In this case I somewhat trust my blog’s RSS, but otherwise this can be a field day for someone wanting to play around with XSS attacks.
Either way, this is just a straight forward component that shows the post excerpt and a link to the post. All we have to do is include it in index.vue
Register the component:
import Posts from '../components/Posts.vue'

export default {
  name: 'Index',
  components: {
    'app-posts': Posts
  },
  ...
}
Then use it:
<template>
  <div>
    <h1>Hello world!</h1>
     Welcome to my website.
  </div>
  <div>
    <h2>blog posts</h2>
    <app-posts :posts="posts" />
</template>
Note that we are binding posts to the posts property which comes from asyncData. It works the exact same way as data!
If everything is done correctly you should be able to see the blog posts on your page. Congratulations, you’ve made your vue SSR app!
Additionally, if you “view source” you will notice that the blog posts are already rendered on page load. No client side JS is actually required here, thanks to SSR!
Deploying
As I mentioned, my website was an existing platform deployed on digital ocean behind nginx. Plus, it hosts my wordpress blog on the same domain, and I didn’t want to change either. Therefore, the node app had to sit behind nginx. It’s a good idea to have some sort of proxy in front of express anyway.
I also use the node process manager, pm2 to background and fork the express process to use more than one cpu.
This is my ecosystem.config.js
module.exports = {
  apps: [{
    name: 'errietta.me',
    script: 'server/index.js',

    instances: 0,
    autorestart: true,
    watch: false,
    max_memory_restart: '1G',
    env: {
      NODE_ENV: 'production',
      HOST: '127.0.0.1',
      API_URL: 'https://www.errietta.me'
    }
  }]
}
I was terrified about getting Ubuntu 14.04 to autostart my node app on system startup; I’d have to mess around with upstart or systemd and I’ve never been particularly good at those things. However, pm2 to the rescue! All I had to do was to run pm2 startup and follow the instructions and voila! My node app would auto start.
I also followed this tutorial to set up the nginx reverse proxy. As mentioned, I did want to preserve the php configuration of my blog, which ended up being surprisingly easy.
First step was to register the node.js upstream:
upstream my_nodejs_upstream {
    server 127.0.0.1:3000;
    keepalive 64;
}
I edited my already existing server { } block and I kept this section:
server {
    # other config ....
    location /blog {
        index index.php index.html index.htm;

        if (-f $request_filename) {
            break;
        }

        if (-d $request_filename) {
            break;
        }

        location ~ \.php$ {
            fastcgi_pass 127.0.0.1:9000;
            fastcgi_index index.php;
            fastcgi_param SCRIPT_FILENAME /path/to/$fastcgi_script_name;
            include fastcgi_params;
        }

        rewrite ^(.+)$ /blog/index.php?q=$1 last;
        error_page  404  = /blog/index.php?q=$uri;
    }
Before adding the section to proxy everything else to node:
   location / {
      proxy_set_header X-Forwarded-For $proxy_add_x_forwarded_for;
      proxy_set_header Host $http_host;
      proxy_set_header X-NginX-Proxy true;
      proxy_http_version 1.1;
      proxy_set_header Upgrade $http_upgrade;
      proxy_set_header Connection "upgrade";
      proxy_max_temp_file_size 0;
      proxy_pass http://my_nodejs_upstream/;
      proxy_redirect off;
      proxy_read_timeout 240s;
    }
And, we’re done – I had replaced my site’s php back-end with a node.js vue SSR backend and preserved the PHP parts I still needed, quite easily.
I hope you enjoyed this account of how I initiated, developed, and deployed my website to its new vue-ssr home, and that it proves helpful in some way.
If you want to see the finished version, check out my github!